Friday, 10 May 2013
FINAL MUSIC VIDEO
Our music video file was too big to upload to our blogs and therefore we have had to put the video onto a disk.


Thursday, 9 May 2013
Evaluation Question #4
How did you use media technologies in the construction and research, planning and evaluation stages?
In order to answer this question, we created a slideshow with a voice over to evaluate what media technologies we used and why we used them.
In order to answer this question, we created a slideshow with a voice over to evaluate what media technologies we used and why we used them.
Evaluation Question #3
What have you learnt from your audience feedback?
To answer this question we made a short powerpoint presentation which includes a video of someone giving us some audience feedback. The feedback that we got suggested to us that in the future if we were to do this all over again, then we should change a few little things to improve it...
To answer this question we made a short powerpoint presentation which includes a video of someone giving us some audience feedback. The feedback that we got suggested to us that in the future if we were to do this all over again, then we should change a few little things to improve it...
Wednesday, 8 May 2013
Evaluation Question #2
How effective is the combination of your main product and ancillary tasks?
To answer this question we decided to create a Prezi presentation because we thought that it would be something different to try out and would be more eye-catching than an ordinary PowerPoint. Throughout the presentation we analyse why it is a good idea to have a combination of a digipak and advertisement poster as well as the actual music video itself. Below is the link to our presentation.
http://prezi.com/qdsrb7llrwbn/evaluation-question-2/
Evaluation Question #1
In what way does your media product use, develop or challenge forms and conventions of real media products?
We decided to answer this question by creating a Directors Commentary video. Throughout the video we evaluate how we used the standard conventions of successful professional music videos to make our final piece look as good as it could possibly look.
http://www.youtube.com/watch?v=GBGim6JDTyM
We decided to answer this question by creating a Directors Commentary video. Throughout the video we evaluate how we used the standard conventions of successful professional music videos to make our final piece look as good as it could possibly look.
http://www.youtube.com/watch?v=GBGim6JDTyM
Thursday, 2 May 2013
Production - The making of our poster
We used photoshop to edit our poster. We took the idea from Gabrielle Aplin to use the picture on the digipak as the picture on the poster. This made it a lot easier for us to get the poster done quicker.


Above is the picture we used for one of the sides of our digipak. We used this picture as the picture for the poster because we though it would ensure that anyone who looked at the poster would recognise the digipak and therefore the music video.

This is the picture after we edited it, added text and changed the saturation. Once we had finished this we had a discussion and thought that it would look better in colour as it would keep with the theme of the digipak and the music video. So we changed it back to a coloured picture...

So this is our final poster. We think it looks quite professional and are happy with the way it turned out.

Research - Poster ideas
When travelling on the London underground, Amy spotted a poster advertising Gabrielle Aplin's single Please Don't Say You Love Me. This is an advantage as we can use this poster for inspiration for our own.

She has used the same picture for her poster as the one that is on her digipak and we thought this would be a really good, time saving option for our piece. So we have now got some ideas that will help us to create our poster that will advertise our music video/song.
She has used the same picture for her poster as the one that is on her digipak and we thought this would be a really good, time saving option for our piece. So we have now got some ideas that will help us to create our poster that will advertise our music video/song.
Production - Our behind the scenes footage!!!
If this doesn't work then here is the link to the video on YouTube, http://www.youtube.com/watch?v=9Nbgkv8DVyo&feature=youtu.be
Production - The making of our digipak
When first making our digipak we got a little confused and ended up making something that looked like a CD.


We soon realised that this was wrong and we needed to make it look more professional by using a template and making our digipak on card. We decided to use a different template to the one I first found as we wanted to make it easier for ourselves and just used a 4 sided one rather than a 6 sided one.

After this picture was taken we realised that the two bottom pictures needed to be upside down and so we changed this immediately. The making of our digipak from then on went quite smoothly and we fitted the images to the template correctly. We left margins like the template told us to to ensure that there was enough room to bend the digipak in to position.
Luckily, Amy was able to visit a professional printing company where she managed to get our digipak printed on the correct type of card and folded properly. Below are some pictures of the making of our digipak.


We are very pleased with the final product and we think it looks very professional.


We soon realised that this was wrong and we needed to make it look more professional by using a template and making our digipak on card. We decided to use a different template to the one I first found as we wanted to make it easier for ourselves and just used a 4 sided one rather than a 6 sided one.

After this picture was taken we realised that the two bottom pictures needed to be upside down and so we changed this immediately. The making of our digipak from then on went quite smoothly and we fitted the images to the template correctly. We left margins like the template told us to to ensure that there was enough room to bend the digipak in to position.
Luckily, Amy was able to visit a professional printing company where she managed to get our digipak printed on the correct type of card and folded properly. Below are some pictures of the making of our digipak.
We are very pleased with the final product and we think it looks very professional.
Thursday, 18 April 2013
Research - Gabrielle Aplin's digipak
Amy was able to go up to London and meet Gabrielle Aplin which was SUCH an amazing thing. While she was there she got consent to use her song in our video and said that she would like to see it when it's done. WOW.

Amy also go an original copy of Gabrielle Aplin's digipak for Please Don't Say You Love Me. This was helpful as we could see what she had done in terms of incorporating her poster into her digipak. This is the idea we had and so the digipak gave us lots of inspiration for ours.


Amy also go an original copy of Gabrielle Aplin's digipak for Please Don't Say You Love Me. This was helpful as we could see what she had done in terms of incorporating her poster into her digipak. This is the idea we had and so the digipak gave us lots of inspiration for ours.
Wednesday, 17 April 2013
Research - Digipak template
I have been searching and have found a really helpful digipak template that is going to help us when creating our own.


The template shows what should go where and how the digipak will fold. This is going to be really helpful for us as we can follow this template to ensure that our digipak looks relatively professional.
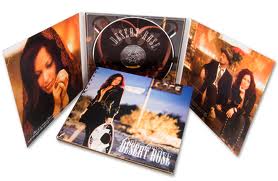
Research - Examples of digipak's
Below are some examples of digipaks. You can see that they usually have 6 panels, 3 on the inside and 3 for the covers.


Research - Digipak's
According to http://en.wikipedia.org/wiki/Digipak, A digipak should typically consist of a gatefold (book-style) paperboard or card stock outer binding, with one or more plastic trays capable of holding a CD or DVD attatched to the inside.
Digipak style packaing is often used for CD sigles or special editions of CD albums. Licensed digipak maufacturers such as Oasis Disc Manufacturing recommend coating the raw printed paper with a protective UV coating, thus ensuring longer life.
Digipak style packaing is often used for CD sigles or special editions of CD albums. Licensed digipak maufacturers such as Oasis Disc Manufacturing recommend coating the raw printed paper with a protective UV coating, thus ensuring longer life.
Editing - A whole day of editing
We were able to edit our piece during the day and also stay late after school in order to get our editing done as quickly as possible so that we could move on to our ancillary tasks. We got all of the editing done in the time that we allocated ourselves and it was relatively stress free!!!
Production - Final, final, final shoot!!!!!
So bad news. We couldn't film on the 25th due to our reservations for the sports hall being over booked. This meant that we couldn't use the sports hall and all other areas of the school was occupied that eveing. However we managed to book the main hall of the boys school for our final shoot the following Wednesday.
On the Wednesday we filmed everything we needed but not without any problems, of course. We booked the hall, however we needed to be packed up for 7. This was fine, we thought we could make it, but somehow we still needed more time!!! We decided that we were being far too picky and just packed up with the shots that we had. We have looked back through the footage and we seem to have everything we need to make our final piece work. So despite the looooooong, problematic and chaotic process of filming, we have managed to achieve what we set out to achieve and hope that everything will come together nicely.
I think we're all just hoping the editing process will less disasterous!!
Monday, 25 March 2013
Production - FINAL shoot
The shoot on Friday 15th March didn't work out due to the fact that I was unexpectedly ill and couldn't come in. We are starting to feel now as though we might have bitten off more than we can chew. However, we are all healthy and in school today so we are going to try and get this last shoot done tonight. We are confident in ourselves today as we have got everything we need and there really shouldn't be anything stopping us from getting this done!
Monday, 11 March 2013
Planning - Our final shoot
At this point, we have filmed everything except for the prom scene. So we have sat down and discussed when we are going to film it. We decided that this Friday (Friday 15th March) would be the best time as this is when everyone is free. Then we will all be finished for next week when we can start to think about editing. Hopefully everything goes well and there are no more problems that will set us back any further.
Planning - Costume
Amy's costume
We decided for the shoot on Wednesday that Amy should wear something bold to show that she is the main focus of attention. We feel this way as she is portraying the way in which the artist feels and is the character that we want most people to focus their attention on. We picked out a bright red coat for Amy as we didn't want her to look abnormal in the surroundings but still wanted her to be the center of attention. The red colour attracts the eyes of the audience, however the fact that it's a coat seems perfectly normal for where she is in the shoot.


We decided for the shoot on Wednesday that Amy should wear something bold to show that she is the main focus of attention. We feel this way as she is portraying the way in which the artist feels and is the character that we want most people to focus their attention on. We picked out a bright red coat for Amy as we didn't want her to look abnormal in the surroundings but still wanted her to be the center of attention. The red colour attracts the eyes of the audience, however the fact that it's a coat seems perfectly normal for where she is in the shoot.

Amy's outfit actually matches this one we found of Zooey Deschanel, who was one of our main fashion insprations for out outfits.

Third shoot - Behind the scenes pictures

Above is a picture of us setting up the crane in order to create our large crane shot with me sitting on the fence.

Here is a picture of me sitting on the fence with the guitar, Amy filming me and Jakob using the reflector in order to get the right amount of lighting on me.


Production - Third shoot (Wednesday 6th March)
For this shoot we were allowed our last two lessons of the day (Media Studies) to go out and get things filmed. We wanted to do the Capstone Country Park shoot on this day as it gave us more day light to get things filmed in. We started off by the pond filming the part with Amy and Michael, where they are seen sitting and enjoying a day out, when a girl smiles and waves at Michael. This causes an argument between Amy and Michael and Amy ends up walking away looking upset and distressed. The shoot went really well, we captured everything we wanted to and looking back at it, it looks really realistic. We are very happy with the way it turned out.
On the same day we also shot the scenes where I am singing on the fence and in the field. We were also really happy with how this shoot turned out. However, towards the end everyone started to get cold and agitated so luckily we got everything done quickly. Overall, the day was a success and we got everything completed that we needed to!
On the same day we also shot the scenes where I am singing on the fence and in the field. We were also really happy with how this shoot turned out. However, towards the end everyone started to get cold and agitated so luckily we got everything done quickly. Overall, the day was a success and we got everything completed that we needed to!
Production - Second shoot behind the scenes pictures

This is a picture of Michael and I getting the stools ready for the tables. The tables were too high for us to sit on just one stall each so we had to sit on about three each, hence the number of stools.

A picture of one of the tables we set up to look like one you would see in a cafe.

This is a wide shot showing everything that was going on in the room where we were filming. It looks like a bit of a mess here but we had everything organised really....

This is a shot of us having a giggle before we started filming.

This is one of the two soft boxes that we used for extra lighting for our footage. They helped a lot to give us the light we wanted, and the reflector that we used helped us further to get the light exactly where we wanted it in the shot.
Production - Second shoot (Monday 4th March)
On this day we bought in everything that we needed for the shoot and made the boy's school cafeteria look like a Costa Coffee. Everything went really well and we managed to pull it off. We set everything up where we wanted it and started to film. The shoot took about 2 and a half hours in total to get the correct shots and make sure there was nothing missed out. Overall the shoot was a really good one and we managed to get everything we needed. So that's one shoot we can cross of the list!!!!
Production - First shoot (Friday 1st March)
On the Friday, two of our actors (Natasha and Charlie) informed us that they couldn't make it. This put a real spanner in the works as it meant that we had lost two of our main characters. Due to this, we had to think of something soon and decided that Amy and her friend Michael would play the couple instead.
So we all stayed after school on the friday to get everything done. We had the gazebo, the fairy lights, the costumes and everything seemed as though nothing could go wrong. But it did... It took way longer than we thought it would to set up the gazebo and fairy lights and by the time we got it all done it was almost time for us to evacuate. To make matters worse, when we turned all of the fairy lights on, only half of them worked. This was a mistake on our part as we should have checked that they all worked before hand to ensure that something like that would not happen.
At the end of the evening, we decided to reschedule as everyone was in a bad mood and just wanted to get home. The shoot was a bit of a failure but we have learnt from our mistakes and will try again.
Monday, 25 February 2013
Production - FINAL timetable
As we didn't get anything done throughout half-term as we were all so busy, we sat down today as a group and discussed when we are all going to be free in order to get our filming done. We were informed by our teacher that our deadline is Wednesday 6th March, which is next week. It seemed to us at the time that we weren't going to have enough time to film, however after deliberating thoroughly we came up with plans for our next shoots.
- SHOOT 1 - Friday 1st March. This shoot is going to be the prom shoot. We decided to have this shoot on this day as we are going to be at school throughout the day and would only be able to film from 15:00 onwards. This meant that we could not do the field shoot on this day due to the light that we would need. The prom shoot will not need any natural daylight and so this is the one we have decided to do on this day.
- SHOOT 2 - Monday 4th March. This shoot is going to be the cafe shoot. We have decided to film this shoot on this day as the only other days that all of us could film were this day and Wednesday 6th March, and we could not film the field shoot on the Monday day for reasons stated below.
- SHOOT 3 - Wednesday 6th March. This shoot is going to be the field shoot. The reason for this is that we are going to need daylight for this shoot and after school there is not enough daylight. On the Wednesday, we have a double Media Studies lesson at the end of the day. We asked our teacher if we could have both lessons to film outside of school and they understandingly agreed. This meant that we would be able to leave at lunch time and get to our location with plenty of daylight to spare. We know that this is the final day for filming and we have left it until quite late, but we are certain that because of the amount of planning we have done for the shoot it will go well with no implications.
Wednesday, 13 February 2013
Planning - Costume
From the shoot that we tried to do on Friday 8th February, I learnt that it is way too cold outside to be wearing a dress with tights. This has made me think about other possible costumes that I could use for my character that will be warmer but still create the same feel for the video. I have searched around for inspiration and my favourite idea is a pair of black jeans with a thin jumper, denim jacker and scarf with some white flats to finish off the look. This would still make me stand out from the background and definitely make me the centre of attention in my scenes.


Production - First shoot
On Friday we made it to Capstone Country Park after school with everything we needed. Unfortunately Jakob couln't make it which made it difficult to film the parts that I am in. This meant that a lot of the stuff we wanted to film on that day couldn't be filmed. To make things worse, we lost light very quickly as we had school on that day and we started filming at about half 4. And to make thing even worse than that, it started to rain half way through filming Natasha and Charlie.
So all in all, we weren't able to get any shots that we would be happy using for the final product. This means that we are going to have to start the whole thing again another day, when we have the whole day to film. We are thinking of doing this one day within the half term holidays, but we have yet to sit down and discuss an actual date.
We have learnt from our mistakes and will plan better for the future.
Thursday, 7 February 2013
Planning - Costume
Jakob's costume
For Jakob we want something that will make him look normal, as though he has literally come to the cafe to meet with his girlfriend. The outfit needs to be dark in colour as we wanted to incorporate his feelings into the video and this would be a lot easier if he was to be dressed in dark colours. So in the end we decided on:

This outfit also matched mine as I am wearing blue and a maroon-y type colour. This represents that we are a couple. The colours are also in opposite places as I am wearing a blue jacket and Jakob's is maroon.

For Jakob we want something that will make him look normal, as though he has literally come to the cafe to meet with his girlfriend. The outfit needs to be dark in colour as we wanted to incorporate his feelings into the video and this would be a lot easier if he was to be dressed in dark colours. So in the end we decided on:
- A dark coloured hoodie
- Dark trousers
- Black shoes

This outfit also matched mine as I am wearing blue and a maroon-y type colour. This represents that we are a couple. The colours are also in opposite places as I am wearing a blue jacket and Jakob's is maroon.

Planning - Costume
Charlie's costume
For Charlie we wanted something too that he would wear on a regular day to day basis so that he doesn't look out of place. We settled on:
For the prom scene, we decided that Charlie should wear something a lot more smart than the first scene. He will be wearing:
For Charlie we wanted something too that he would wear on a regular day to day basis so that he doesn't look out of place. We settled on:
- Jeans
- A coat
- Trainers
For the prom scene, we decided that Charlie should wear something a lot more smart than the first scene. He will be wearing:
- Trousers
- A shirt
- Shoes
Planning - Costume
Natasha's costume
We decided that Natasha should wear an outfit that would look natural, as if she was actually on a day out to the country park with her boyfriend. This ended up being:
For the prom scene we thought that Natasha should dress up a bit more, as proms are usually a big thing for girls and they want to look their best. She will be wearing:
We decided that Natasha should wear an outfit that would look natural, as if she was actually on a day out to the country park with her boyfriend. This ended up being:
- Jeans
- A coat
- Ankle boots
For the prom scene we thought that Natasha should dress up a bit more, as proms are usually a big thing for girls and they want to look their best. She will be wearing:
- A long prom dress
- Heels
Planning - Costume
Despite my efforts I could not find an outfit that resembled the one that I wanted to use for the shoot tomorrow. Due to this, I have had to come up with another outfit that I think will be suitable for the music video, using clothes that I already had. The outfit consists of:

Although it wasn't my favourite outfit of the lot, it will work just as well as the others to create the right feel for the video.
- A summer dress
- Tights
- A denim jacket
- Shoes

Although it wasn't my favourite outfit of the lot, it will work just as well as the others to create the right feel for the video.
Wednesday, 6 February 2013


Subscribe to:
Comments (Atom)